 English
  English
 中文简体
中文简体 русский

/ Categories


Drywall Screws
-
Cross Flat Head Dry Wall Nail


Drywall Screws Manufacturers
Drywall screws are specialized screws designed for fastening drywall sheets to wood or metal studs. They are typically used in construction and home improvement projects for installing gypsum board (drywall) on walls or ceilings. Drywall screws have specific features that make them suitable for this purpose:
Coarse thread: Drywall screws have a coarse thread pattern that allows them to grip the drywall material securely and prevent it from loosening over time.
Sharp point: They have a sharp, self-drilling point that eliminates the need for pre-drilling pilot holes in most cases. This feature enables easy and efficient installation.
Bugle head: Drywall screws feature a flat, slightly rounded head known as a bugle head. This design allows the screw to be countersunk into the drywall surface, leaving a dimple that can be easily covered with joint compound or spackling.
Drywall screws are available in various lengths, typically ranging from 1 inch to 3 inches. The length of the screw will depend on the thickness of the drywall and the type of underlying stud material being used.
When working with drywall screws, it's important to follow proper installation techniques to ensure a secure and professional finish. This includes using the right length of screws, spacing them appropriately, and not overdriving them to avoid damaging the drywall surface.
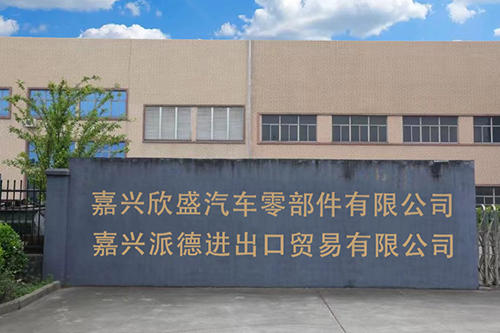
Jiaxing Paide Import and Export Trading Co., Ltd.
Solutions suitable for all industries and factories.
Jiaxing Paide Import and Export Trading Co., Ltd. as China Wholesale Drywall Screws Manufacturers and Custom Drywall Screws Suppliers located in the Jianshan New Area of Haining, Jiaxing, it is rich in resources, convenient in transportation, and has a very advantageous geographical location, which provides natural conditions for the development of an export-oriented economy. The company specializes in developing and manufacturing various series of screw products and various fasteners, with a one-stop processing and heat treatment service, complete self inspection equipment, and strict quality control. The company was founded in 2000, with a total investment of over 100 million yuan, covering an area of 25 acres, and an annual output of over 10000 tons.
Honor
-
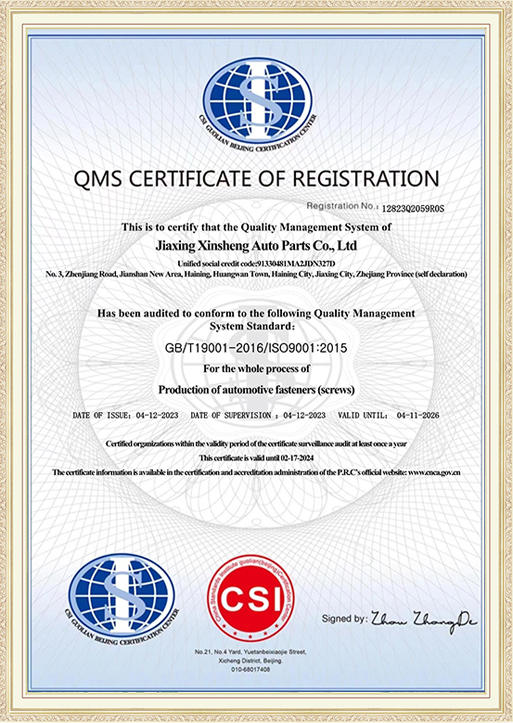 honor
honor -
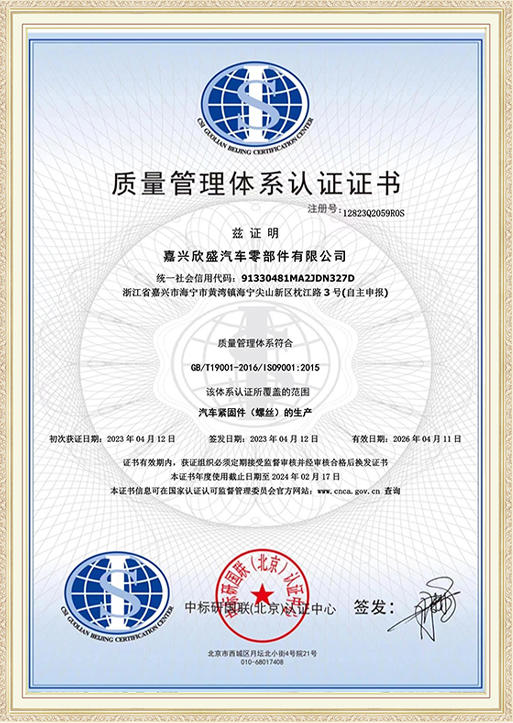 honor
honor
News
-
2024-05-01
When it comes to fasteners for specific materials like rice fiberboard, understa...
View More -
2024-04-25
When it comes to fasteners designed for durability, corrosion resistance, and ef...
View More -
2024-04-16
In the realm of construction and carpentry, precision and aesthetics are paramou...
View More -
2024-04-11
U-bolts, also known as U-shaped screws, are a fundamental type of fastener with ...
View More -
2024-04-07
When it comes to fastening components in construction, manufacturing, or DIY pro...
View More -
2024-03-26
Hexagonal screw bolts, also known as hex bolts or hexagonal head bolts, are wide...
View More
Industry Introduction
Are there any limitations or considerations when using Drywall Screws?
Yes, there are some limitations and considerations to keep in mind when using drywall screws. While they are specifically designed for fastening drywall to wood or metal studs, they may not be the ideal choice for all applications. Here are some important limitations and considerations:
Material Compatibility: Drywall screws are intended for use with drywall and may not be suitable for other materials. Using drywall screws in materials that are harder or thicker than drywall can result in insufficient holding power or even breakage of the screws.
Brittleness of Drywall: Drywall is a relatively brittle material. Over-tightening drywall screws can cause the drywall to crack or break, leading to weakened fastening. It's essential to drive the screws carefully and avoid excessive force.
Not for Load-Bearing Applications: Drywall screws are not designed for load-bearing applications. They are intended for securing drywall to studs and should not be used for structural purposes or to support heavy loads.
Limited Corrosion Resistance: Drywall screws are typically made from carbon steel, which is not highly corrosion-resistant. Therefore, they are best suited for indoor applications. If using drywall screws in moist or outdoor environments, it's essential to select screws with appropriate corrosion-resistant coatings.
Size and Length Selection: Choosing the right size and length of drywall screws is crucial for a proper installation. Using screws that are too short may not provide enough holding power, while using screws that are too long can cause damage to electrical wires or plumbing behind the drywall.
Type of Drywall Screw: There are different types of drywall screws, including coarse-threaded and fine-threaded screws. Coarse-threaded screws are commonly used for wood studs, while fine-threaded screws are preferred for metal studs. Using the wrong type of screw for the specific application can result in inferior performance.
Drywall Screw Guns: When using power tools, such as drywall screw guns, it's essential to adjust the depth setting correctly. Overdriving or underdriving the screws can lead to issues with the drywall's integrity and the effectiveness of the installation.
Avoid Reusing Screws: Drywall screws are not designed for reuse. Once they are driven into the drywall and the studs, their holding power may diminish if removed and reused.
Drywall Screw Spacing: Proper spacing of drywall screws is essential to ensure the drywall is adequately supported and to prevent sagging or cracking. The recommended spacing is typically 12 to 16 inches apart along the studs.
How do you properly install Drywall Screws to ensure effective and secure fastening?
Properly installing drywall screws is crucial to ensure effective and secure fastening of drywall to studs. Here are the steps to follow for a successful installation:
Prepare the Drywall: Cut the drywall panels to the appropriate size and ensure they fit snugly against the studs. Dry fit the panels in place to make any necessary adjustments before installing the screws.
Select the Right Screws: Use drywall screws that are appropriate for the application, such as coarse-threaded screws for wood studs or fine-threaded screws for metal studs. Ensure the screws are the correct length for the thickness of the drywall.
Set Up the Drywall Screw Gun: If using a power tool like a drywall screw gun, adjust the depth setting to avoid overdriving or underdriving the screws. The screws should be flush with the drywall surface without breaking the paper surface.
Start in the Center: Begin installing screws in the center of the drywall panel and work your way out towards the edges. This helps to distribute the load evenly and prevents the edges of the drywall from bowing or buckling.
Spacing: Space the screws approximately 12 to 16 inches apart along the studs. Follow the manufacturer's guidelines for screw spacing, which may vary depending on the size and thickness of the drywall.
Avoid Over-Tightening: Be cautious not to over-tighten the screws. As drywall is a relatively brittle material, excessive force can cause it to crack or break, compromising the integrity of the installation.
Drive the Screws Straight: Ensure the screws are driven in straight and perpendicular to the drywall surface. Angled screws may not hold as securely and could cause the drywall to warp.
Avoid Placing Screws Near Edges: Keep the screws at least 3/8 to 1/2 inch away from the edges of the drywall panels to prevent cracking along the edges.
Check for Flushness: As you install the screws, periodically check that they are flush with the surface of the drywall. Sunken screws can cause uneven surfaces and difficulties when finishing the drywall.
Additional Support: For ceilings or areas with a higher risk of sagging, consider adding additional support, such as using adhesive in conjunction with screws or using a thicker drywall.
Drive the Screws Slightly Below the Surface: If you're using a manual screwdriver, drive the screws just below the surface of the drywall without breaking the paper. Then, finish the installation with a joint compound and apply a smooth finish.
Inspect the Installation: After completing the screw installation, inspect the drywall for any loose screws, sunken or raised screws, or other imperfections. Make any necessary adjustments before proceeding with further drywall finishing.

Jiaxing Paide Import and Export Trading Co., Ltd.
- Mobile: +86-13656738385
- Tel: +86-573-87936763
- Fax: +86-573-87936763
- Address: No.3 Zhenjiang Road, Jianshan New District, Haining City.
Leave A Message
Scan Code
Copyright ? Jiaxing Paide Import and Export Trading Co., Ltd. All Rights Reserved.
 Drywall Screws Manufacturers, Factory
Drywall Screws Manufacturers, Factory